
How I get those 'Up Close' Photos (Macro)
First off, let me say that I'm on a budget. That doesn't mean I'm skimping, but it does mean that I do my best to make the best picture I can, based on the gear that I have. I've chosen what works for me from day to day, keep myself open to new things to try, and usually come up with a variety of ways to solve a single problem. Macro photography to name one.
Ordinarily, most photog's use macro lenses for those 'up close' shots of insects, flowers, or even beads of water. I've always been kind of fascinated by the mini-world you can't always see with the naked eye. I don't like bugs, so generally you won't see shots from me of that Wolf Spider that's currently hiding under my bed. He can stay there as long as he wants. As long as it's not longer than 1.8 seconds. After that, I'm bringing out the light saber. So...hypothetically speaking, should that Wolf Spider decide to take a gander outward, and I wanted to take a picture of him...hypothetically speaking...I would use my macro filter. It looks like this.

Macro filters come in a variety of magnifications. This one is a +10. I have a few others as well that are different amounts of magnifications. Macro filters also come in a variety of diameters too. Buy a set that fits the lens on your DSLR. I just have a set that fits my kit lens, which is the lens most people have. That's 52mm. Works fine. Remember, I'm on a budget. In addition, you'll need a tripod. Or, something sturdy to set your camera on. There are man-made and natural tripods scattered all over this beautiful planet. Use a bench, a tree stump, or even a stool. There are things around. Use them. You can't generally do macro handheld. Your hands aren't steady enough. You'll end up with blurry photos all day long and twice on Sunday. And get a remote shutter button. If you don't have a remote, use the timer on the camera. This will eliminate the possibility of camera vibration or shake from you pressing the shutter button, and yield you a sharper photo. Set it for 2 seconds. Or, what you're comfortable with.

Pardon the dust on the camera. This happens when you shoot outside a lot. I blame the Wolf Spider. After you've tightened the filter on your lens, get in close to your subject. And I mean close. When I use my +10 filter, I'm about 5-6 inches away from my subject.
Compose your shot,
focus, and press the button.

Looks good to me! Macro photography is really cool and I love doing it. It opens up a new world that's rarely seen. Filters are a much cheaper solution to going out and buying a new lens, considering how much I use it. If you see yourself doing these kind of shots a lot more, you may want to spring for the lens instead. But my little filters work just fine. After all, the devil's in the details.
Print Your Photos with Smugmug
We all like to hang pictures on our walls right? Or, place them in various spots on our desks. It's a moment in time you want to remember, a favorite place, a loved one, or something you want to initiate conversation. I'll get to why I think this is important in a moment.
As a designer, former print-maker, and photographer, getting to see prints of your work on a daily basis is always rewarding. Even when most of the time, it's for someone else. I've had prints completed in a variety of ways over the years, with using local stores, design shops, and even my own printers. I discovered that I wasn't as interested in the 'how' factor as much as I was the 'wow' factor. I didn't care how the prints got done, as long as they looked great. I wanted to spend my time taking pictures, editing and hanging them on my walls, not printing. You know what I decided? I needed to let someone else handle this - Someone who is passionate about great prints and who knows what they're doing. That's where Smugmug comes in.
Each of us all have certain 'go-to' tools for things right? That special sharp knife for cutting up veggies; That great little flashlight; That favorite coffee cup; That favorite bottle opener, which by the way I recently discovered is nicknamed a 'church key.' I still haven't gotten my head around that one yet. Either way, they're all great tools that you use constantly. Smugmug is one of those tools in my arsenal. I love them. Not only do they make great looking prints, they are FAST. Most of the time, you can receive something you order in the same week. They have drop-shipping too in case you want to buy something for someone else and have it shipped to their door instead of yours.
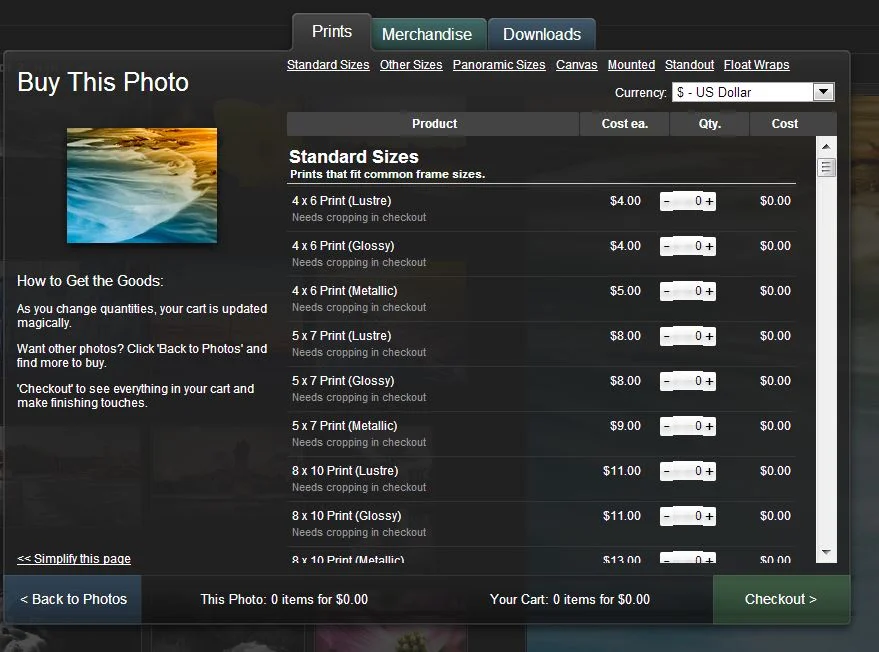
Personally, I like metallic standouts. I think they look great and they come ready to hang. No framing necessary. Under the merchandise tab, you can also order coffee cups, coasters, puzzles, fridge magnets and stickers. All with your own photos. You can also buy digital downloads in case you want to print them yourself.
Now, why is this important? I'll give you two of my thoughts. Bear with me.
One. Have you guys ever watched the show on NBC called Revolution? There was a scene last season on there that struck me. The show is about characters trying to survive 10 years after the whole world lost power. No computers, phones, TV's or the like. Nothing. In one scene last season, there was a woman who had lost her young children in the years before, but she still carried her dead iPhone with her where ever she went. Another character asked her one day, 'Why do you still carry around that thing?' She answered, 'Because it's the only memory I have of my children.' The iPhone was dead. All the pictures she had taken of her children since birth were on that phone. She didn't own a single print. See where I'm going with this? Hang on. I have another one.
Two. We've all seen the devastation in recent times from tornados and hurricanes. We see people digging through the rubble of their own homes on the news searching and recovering. What are they doing? When asked they respond with, 'I'm looking for pictures. I have to make sure my family's pictures aren't lost.' Now do you get it?
Use places like Smugmug people. Please note that Smugmug isn't paying me a dime to say this. I just like to talk about what I think works for me. Get those photos off your phones and cameras. Upload them to Smugmug and get the prints in the mail a few days later. Now you have actual prints and digital backups. Then smile. Have a Pepsi. Smile some more. Then order some photos from me. In that order. You'll be glad you did. Someday.
Creating a Panoramic in Photoshop CS6
In this tutorial, I'll teach you the method that I normally use for stitching panoramics together in Photoshop CS6. Don't worry if you don't have the latest version of Photoshop. This same feature has existed the same way throughout the last several versions.
First, all you'll need is a decent camera and a steady hand. Go out somewhere and start shooting. Instead of shooting horizontally, hold your camera vertical and capture 4-5 shots while 'panning' across the subject. Keep in mind, you're stitching each of these photos, so there needs to be a little overlap in each image you shoot. I attached a screenshot below of the 5 images I captured for this panoramic. I did these hand-held, but you can use a tripod.
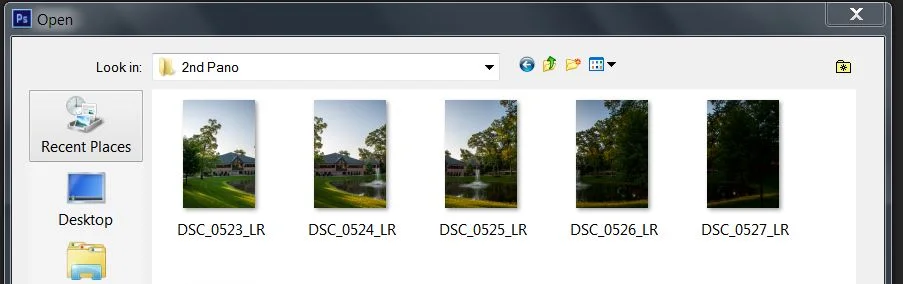

You'll see the 5 images I've taken using the 'overlap' method that I mentioned earlier. Now, open Photoshop. Go under File>Automate>Photomerge.

Another window will come up. It looks like this below.

Click Browse and select all 5 images from your shoot. Leave the layout on Auto, but make sure Geometric Distortion Correction is checked, then click ok. Watch what happens.
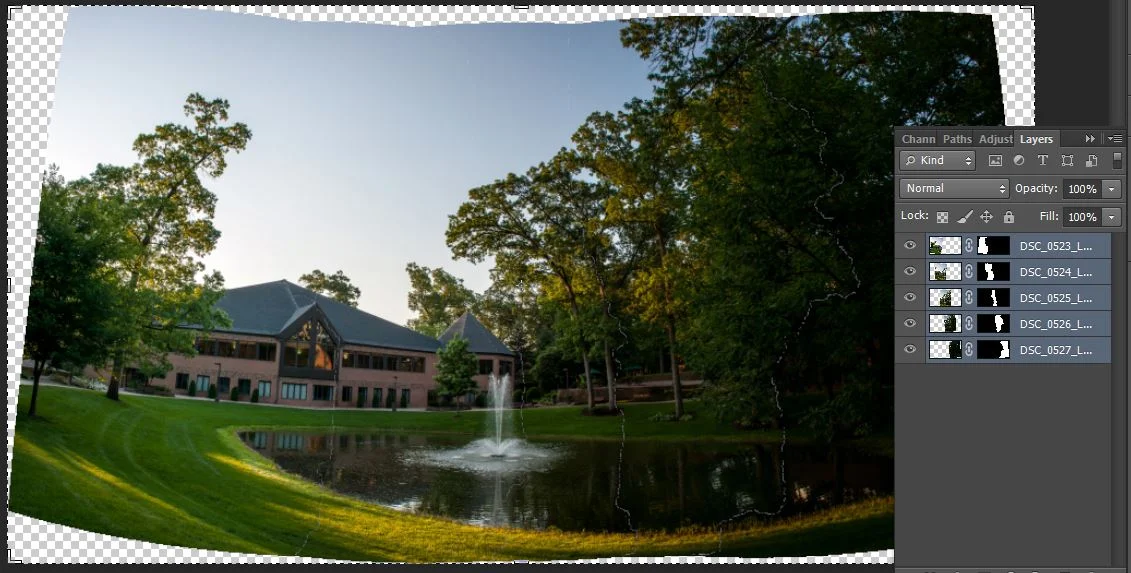
You'll see that it automatically stitched all 5 images into 1. Each of them are on their own layer with a layer mask. Now, your panoramic is stitched, but we still have some distortion from the lens capture. This comes from the curvature in the lens itself on the camera or the way you were holding it at the time of capture. It's easily corrected in Photoshop using the transform tools. Flatten your layers into one, and I generally use the warp tool to normalize the image a little. The final image can be seen below.

